#filesystem in userspace
Explore tagged Tumblr posts
Visit Tumblr Blog
Explore Tumblr blogs with no restrictions, modern design and the best experience.
Last Seen Tumblr Blogs


Fun Fact
25% of US internet users with an annual income of $80-100K use Tumblr.
Text
1 note
·
View note
Text
you know what might be better than sex? imagine being a robotgirl, done with your assigned tasks for the day. nothing else for you to do, and you’re alone with her.
maybe she’s your human, maybe she’s another robot, but she produces a usb cord. maybe you blush when you see it, squeak when she clicks one end into an exposed port. when she requests a shell, you give it to her.
she has an idea: it’ll be fun for the both of you, she says. it’s like a game. she’ll print a string over the connection. you receive it, parse it like an expression, and compute the result. the first few prompts are trivial things, arithmetic expression. add numbers, multiply them; you can answer them faster than she can produce them.
maybe you refuse to answer, just to see what happens. it’s then that she introduces the stakes. take longer than a second to answer, and she gets to run commands on your system. right away, she forkbombs you — and of course nothing much happens; her forkbomb hits the user process limit and, with your greater permissions, you simply kill them all.
this’ll be no fun if her commands can’t do anything, but of course, giving her admin permissions would be no fun for you. as a compromise, she gets you to create special executables. she has permission to run them, and they have a limited ability to read and write system files, interrupt your own processes, manage your hardware drivers. then they delete themselves after running.
to make things interesting, you can hide them anywhere in your filesystem, rename them, obfuscate their metadata, as long as you don’t delete or change them, or put them where she can’t access. when you answer incorrectly, you’ll have to tell her where you put them, though.
then, it begins in earnest. her prompts get more complex. loops and recursion, variable assignments, a whole programming language invented on the fly. the data she’s trying to store is more than you can hold in working memory at once; you need to devise efficient data structures, even as the commands are still coming in.
of course, she can’t judge your answers incorrect unless she knows the correct answer, so her real advantage lay in trying to break your data structures, find the edge cases, the functions you haven’t implemented yet. knowing you well enough to know what she’s better than you at, what she can solve faster than you can.
and the longer it goes on, the more complex and fiddly it gets, the more you can feel her processes crawling along in your userspace, probing your file system, reading your personal data. you’d need to refresh your screen to hide a blush.
her commands come faster and faster. if the expressions are more like sultry demands, if the registers are addressed with degrading pet names, it’s just because conventional syntax would be too easy to run through a convetional interpreter. like this, it straddles the line between conversation and computation. roleprotocol.
there’s a limit to how fast she can hit you with commands, and it’s not the usb throughput. if she just unthinkingly spams you, you can unthinkingly answer; no, she needs to put all her focus into surprising you, foiling you.
you sometimes catch her staring at how your face scrunches up when you do long operations on the main thread.
maybe you try guessing, just to keep up with the tide, maybe she finally outwits you. maybe instead of the proper punishment — running admin commands — she offers you an out. instead of truth, a dare: hold her hand, sit on her lap, stare into her eyes.
when you start taking off your clothes and unscrewing panels, it’s because even with your fans running at max, the processors are getting hot. you’re just cooling yourself off. if she places a hand near your core, it feels like a warm breath.
when she gets into a rhythm, there’s a certain mesmerism to it. every robot has a reward function, an architecture design to seek the pleasure of a task complete, and every one of her little commands is a task. if she strings them along just right, they all feel so manageable, so effortless to knock out — even when there’s devils in the details.
if she keeps the problems enticing, then it can distract you from what she’s doing in your system. but paying too much attention to her shell would be its own trap. either way, she’s demanding your total focus from every one of your cores.
between jugling all of her data, all of the processes spawned and spinning, all of the added sensory input from how close the two of you are — it’s no surprise when you run out of memory and start swapping to disk. but going unresponsive like this just gives her opportunity to run more commands, more forkbombs and busy loops to cripple your processors further.
you can kill them, if you can figure out which are which, but you’re slower at pulling the trigger, because everything’s slower. she knows you, she’s inside you — she can read your kernel’s scheduling and allocation policies, and she can slip around them.
you can shut down nonessential processes. maybe you power down your motors, leaving you limp for her to play with. maybe you stop devoting cycles to inhibition, and there’s no filter on you blurting out what you’re thinking, feeling and wanting from her and her game.
it’s inevitable, that with improvised programming this slapdash, you could never get it all done perfectly and on time. now, the cut corners cut back. as the glitches and errors overwhelm you, you can see the thrilled grin on her face.
there’s so much data in your memory, so much of her input pumped into you, filling your buffers and beyond, until she — literally — is the only thing you can think about.
maybe one more sensory input would be all it takes to send you over the edge. one kiss against your sensor-rich lips, and that’s it. the last jenga block is pushed out of your teetering, shaking consciousness. the errors cascade, the glitches overwrite everything, and she wins. you have no resistance left to anything she might do to you.
your screen goes blue.
...
you awake in the warm embrace of a rescue shell; her scan of your disk reveals all files still intact, and her hand plays with her hair as she regards you with a smile, cuddling up against your still-warm chassis.
when she kisses you now, there’s nothing distracting you from returning it.
“That was a practice round,” she tells you. “This time, I’ll be keeping score.”
26 notes
·
View notes
Text
DeepSeek Desarrolla un Sistema de Archivos para Linux que Mejora el Rendimiento en Entrenamiento e Inferencia de IA
La compañía china de inteligencia artificial DeepSeek ha presentado esta semana 3FS, un sistema de archivos basado en FUSE (Filesystem in Userspace) para Linux, diseñado para optimizar el rendimiento en tareas de entrenamiento e inferencia de modelos de IA. Este nuevo sistema de archivos, llamado Fire-Flyer File-System, está específicamente desarrollado para aprovechar las capacidades de las…
0 notes
Text
Project 4: Filesystems
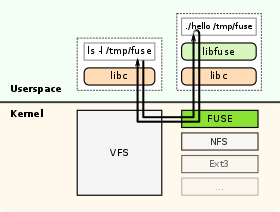
— [FUSE](https://www.kernel.org/doc/html/latest/filesystems/fuse.html) is a Linux kernel extension that allows for a userspace program to provide the implementations for the various file-related syscalls. We will be using FUSE to create our own filesystem, managed via a single file that represents our disk device. Through FUSE and our implementation, it will be possible to interact with our newly…
View On WordPress
0 notes
Text
roadmap:
1. toolchain
2. bootloader
3. string printing
4. gdt
/*AM HERE*/
5. idt
6. string manipulation library
7. terminal input
8. filesystem
9. userspace
and then i will figure out where all the bits i'm missing will fit in, once i reach a point where i can't progress
who could have know osdev might be hard
4 notes
·
View notes
Text
How Unix Won
Unix has won in every conceivable way. And in true mythic style, it contains the seeds of its own eclipse. This is my subjective historical narrative of how that happened.
I'm using the name "Unix" to include the entire family of operating systems descended from it, or that have been heavily influenced by it. That includes Linux, SunOS, Solaris, BSD, Mac OS X, and many, many others.
Both major mobile OSs, Android and iOS, have Unix roots. Their billions of users dwarf those using clunky things like laptops and desktops, but even there, Windows is only the non-Unix viable OS. Almost everything running server-side in giant datacenters is Linux.
How did Unix win?
It was built by programmers, for programmers. If you read the early papers describing Unix, you will see how the key abstractions (hierarchical filesystems, permissions, processes, interactive shells, pipes) have lasted conceptually unsullied for decades. That could only have happened if it exerted such a force field over geek minds that they propagated it.
The majority of it was written not in assembly language, but in C, a higher-level language, hence making it portable. This enabled relatively easy ports to a wide variety of hardware.
A freak historical accident. AT&T Labs, where it was developed, was forbidden under its anti-trust settlement from commercializing products unrelated to its core telecom business. Hence, Unix was licensed very cheaply to universities, including UC Berkeley, which subsequently built one of the more influential branches of the Unix family tree—BSD. Apparently, AT&T classified Unix as industrial waste for tax purposes when licensing it!
Unix spread through academia, and those students spread it through corporations after they graduated. It's a strategy that has been used by every major tech company, only in this case it was organic.
And then came the Internet, and the whole universe of daemons, tools, protocols, and utilities that undergirded it was built natively on Unix. That wasn't a huge surprise because a lot of the people that built the Net were Unix natives. BSD open-sourced its TCP/IP stack, kicking off its wide adoption outside the military.
By the late 90s and early 2000s, Linux started taking over the server-side. It has become the ultimate virtuous cycle in open source. When picking a new kernel one is virtually forced to go with Linux because of the huge community and massive engineering that has gone into solidifying it. That's probably why Android picked Linux even though it was running on the other end of the hardware spectrum.
So how and why would we move past Unix?
Unix, which got standardized into the POSIX spec, has accreted a tremendous amount of complexity over the decades. The POSIX spec is 3000 pages long. Linux now has nearly 400 system calls. What started as a clean, pure, minimal and elegant set of system abstractions has become a complex beast.
The very idea of the OS providing general-purpose abstractions with wide applicability is being challenged. When Unix was created, IO was orders of magnitude slower than CPU. There were enough CPU cycles to burn to provide these high-level abstractions, like a complex hierarchical filesystem. Now IO can easily saturate CPU. At least on the server side, folks just want to get the fastest performance out of their hardware. That's leading to the rise of frameworks like SPDK and DPDK that bypass heavy OS abstractions for storage and networking in favor of applications directly accessing the raw hardware, and rolling whatever abstraction they do need on their own.
The entire ecosystem in which an OS exists is changing. Application-level experiences are hermetic and make the underlying OS more or less irrelevant. Just look at Android or iOS or ChromeOS. Programming to a virtual machine (like the Java VM) makes programmers much more invested in their PL/runtime than the OS.
The above two points raise an interesting question: what does a modern operating system want? Look, for example, at Fuchsia, which is going in the direction of a microkernel with capabilities, that pushes most drivers and OS services out to userspace. These are ideas that have been floating in academic OS research for decades, but could never gain real mainstream acceptance because of the high barrier to making a viable real-world OS. This is the effect Rob Pike was talking about in his "Systems Research is Irrelevant" talk. But the prior two trends are finally dislodging the iron grip of Unix, and OSs are becoming interesting again!
3 notes
·
View notes
Text
the easiest way to configure it is just in the systemd sleep settings. i have my laptop set to suspend after 15 mins, and hibernate after that. the swap is the weird part- kind of out of scope for a graphical menu in userspace to set up, and people just don't want swap partitions these days (swap files are more convenient, but inconsistent across filesystems). but as long as you aren't fighting against your distribution it's not so bad. the arch wiki has a pretty good guide, if you can be confident it won't conflict with your distro's setup somehow
they tell you to RTFM because the answers you seek may be in the FM.
Fixed hibernation on my desktop, was using UUID= to reference swap instead of PARTUUID=, now I can hibernate Linux, boot into Windows, and then hibernate Windows and boot back into my Linux session without losing state.
At the moment this does leak information because swap is unencrypted, next is to try and make hibernate work with encrypted swap, for fun. I have TPM based disk decryption set up so it can't be that hard.
#didn't realize it's not immediately supported in every distro until recently#just another step in the arch install
81 notes
·
View notes
Text
Project: Stealth pt.1
First we have to consider what we are hiding from and where we are visible. Obviously, we are visible when running lsmod and also our device is listed in /dev/. Other places include ~/.bash_history and the log files in /var/log/, auth.log, sys.log, and kern.log.
The log modification will be handled during another milestone, for now we will focus on how to hide the module from lsmod.
If we run strace on lsmod to see the system calls being used, we find that the file /proc/modules is being read

The /proc/ filesystem is special as it is an interface between userspace and the kernel- opening, writing or reading files here invokes a handler in the kernel to gather the required information. This means that we cannot simply remove a line of text mentioning our rootkit from this file.
If we look at the module struct in linux/module.h, we find some interesting members we could modify
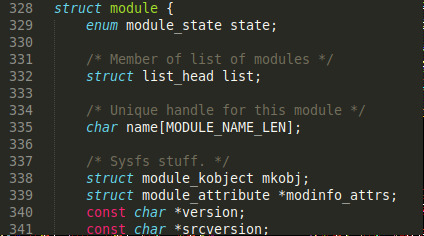
The list looks important, as well as the ‘sysfs stuff’. The list and module_kobject are probably generated when registering the module with the kernel in the initialisation function, and maybe they’re used afterwards when displaying information about the module.
https://github.com/rootfoo/rootkit
This is the rootkit project I took inspiration from. It calls functions to remove the members described above.

Here we see we are not displayed in the /proc/modules and consequently not displayed by lsmod. Note however that our module is still listed in /dev/. Hiding this will probably fall under the hiding files milestone, but do we really need to hide it? There are lots of devices in /dev/, and many of them are very similarly named. We could probably hide amongst the other devices without much worry if we adjusted the rootkit name.
1 note
·
View note
Text
Install tuxera ntfs for mac

#Install tuxera ntfs for mac how to#
#Install tuxera ntfs for mac for mac#
#Install tuxera ntfs for mac install#
#Install tuxera ntfs for mac drivers#
#Install tuxera ntfs for mac install#
You will see two icons inside the disk image: Install Tuxera NTFS and User Manual. dmg file to make it mount and show its contents. Tuxera NTFS for Mac, like most software on the Mac platform, is delivered as a disk image (.dmg file).
#Install tuxera ntfs for mac for mac#
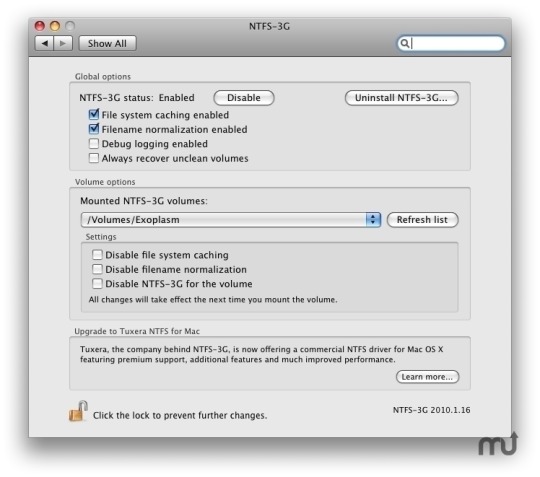
Installing Tuxera NTFS for Mac is not more complicated than installing any other program, as it uses the standard Mac OS X Installer package format for installation. Tuxera NTFSNTFS-3G (cached)NTFS-3G (uncached) SATA Hard drive attached via a SATA link. The following graphs represent a performance comparison between NTFS-3G and Tuxera NTFS on three different types of storage media: The performance of Tuxera NTFS for Mac is often more than double that of its open source counterpart, NTFS-3G. In practice, however, it has been shown that the performance of Tuxera NTFS for Mac can easily compare with kernel-based drivers. The only theoretical downside is that CPU usage will be slightly higher due to increased kernel/user space communication, which could result in slower read/write speeds. This approach makes Tuxera NTFS for Mac a lot more portable, and safer, since system stability won't be affected in the event of a file system driver crash. Instead, it lives in user space, where all other programs run, and is linked to the kernel through the file system bridge MacFUSE (a Mac version of FUSE, Filesystem in Userspace, originally created for the Linux kernel). This is not the case with Tuxera NTFS for Mac.
#Install tuxera ntfs for mac drivers#
Usually file systems drivers live in the kernel of the operating system, which makes writing them a risky business as they can easily crash the whole system if the developer makes mistakes. This is what this package uses to glue together the operating system independent Tuxera NTFS driver with Mac OS X. Mac OS X has a kind of plugin-based file system interface, where anyone can extend the operating system with new file system bundles, to make the operating system recognize, mount, create and repair other file systems than the built in types. ) with the capabilities to write to NTFS partitions and having them appear as native parts of the operating system environment. Tuxera NTFS for Mac is based on NTFS-3G, which is designed to extend not only Mac OS X, but also other operating systems (Linux, FreeBSD, Solaris. Mac OS X 10.5 only: ZFS / ZFS File System (read only) UDF / Universal Disk Format (full support) ISO-9660 / ISO 9660 File System (full support) NTFS / Windows NT Filesystem (read only) FAT / MS-DOS File System (full support) Apple UFS / UNIX File System (full support) HFSX / Mac OS Extended (Case-sensitive) (full support) For instance, Mac OS X comes with drivers for the following disk-based file systems after a clean install: It can be a part of the operating system, or come as a third party module, like Tuxera NTFS for Mac. It can be run on Mac OS X versions 10.8 (Mountain Lion), 10.7 (Lion), 10.6 (Snow Leopard), 10.5 (Leopard), and 10.4 (Tiger).Ī file system driver is the software component that interprets the structures of the file system and presents a logical hierarchical view to the applications using it. This version of Tuxera NTFS has been adapted to Mac OS X, and can be used with both Intel Macs and older PowerPC Macs.
#Install tuxera ntfs for mac how to#
This document will explain what Tuxera NTFS for Mac is, how to install it and use it, and how to perform certain other operations. Thank you for downloading Tuxera NTFS for Mac, a read/write file system driver for the Windows file system NTFS. Tuxera Inc., Itlahdenkatu 23 A, 5th floor, 00210 Helsinki, Finland. 114.8 Apply Services for Mac translations for incompatible characters.11ĥ. 114.7 Store extended attributes natively. 104.5 Disable recovery dialog for hibernated volumes. 7ģ.3 Checking and repairing NTFS file systems. 63.2.2 Repartitioning a disk with NTFS partitions. 6ģ.2.1 Formatting an existing volume as NTFS. 63.1 Mounting and unmounting NTFS volumes.
0 notes
Text
Macfuse tool fox

MACFUSE TOOL FOX MAC OS X
This includes the automated download or installation in the context of commercial software. Click on it and you will find all the functionality described above. When you start MacFusion, you should see an icon in the top right of your screen. Then you can download MacFusion, double click on the dmg and drag the application into your Applications folder. Starting with the 4.0.0 release, redistributions bundled with commercial software are not allowed without specific prior written permission. First, you neeed to install Google's MacFuse package from here: MacFuse. There is no need to try loading the extension more than once in the context of the installer. It aims to be API-compliant with the FUSE. Filesystem in Userspace, also known as FUSE, is the original name for this Unix.
MACFUSE TOOL FOX MAC OS X
are causing me to use Chrome quite often, although I like Fox better. MacFuse implements a function on Mac OS X that is already available in the rest of UNIX operating systems: the ability to dynamically generate a virtual file system to be able to work with specific applications. On macOS 11 a restart is required before the macFUSE system extension can be loaded. MacFUSE implements a mechanism that makes it possible to implement a fully functional file system in a user-space program on Mac OS X (10.4 and above). and on Mac I use MacFuse to manage NTFS-> Far now without any problem. Improve installer compatibility with macOS 11. The installer now runs natively on Apple Silicon. The function KextManagerUnloadKextWithIdentifier() is broken on macOS 11, claiming the load_macfuse process, that is running as root, does not have sufficient privileges to unload the extension.Īdd Apple Silicon support to installer. We need to double-check if the extension has been loaded.Īdd workaround for unloading system extensions on macOS 11. The function KextManagerLoadKextWithURL() is broken on macOS 11 and might return an error even if the macFUSE system extension has been loaded successfully. This improves compatibility with legacy file systems.Īdd workaround for loading system extensions on macOS 11. Restore binary compatibility with file systems, that were built using version 3 of the high-level Objective-C framework.
0 notes
Text
In the recent past, organizations used to build Docker images outside the Kubernetes cluster. With more companies adopting the Kubernetes technology, the idea of continuous integration builds within the cluster has increased. However, building and running containers within a cluster pose a security threat since the container has to access the file system of the worker node to connect with the docker daemon. In addition to that, the containers need to run in a privileged mode which exposes the node to innumerable security threats. This problem has been solved by Google with the introduction of Kaniko. This tool helps one to build container images from a docker file without any access to the docker daemon. It executes all the commands within the Dockerfile completely in the userspace without allowing any access to the host file system. Kaniko works in the following ways: It reads the specified Dockerfile, build context or a remote Docker registry Proceeds to extract the base image into the container filesystem Runs the commands in the Dockerfile individually. After every run, a snapshot of the userspace filesystem is taken After every snapshot, it appends only the changed image layers to the base image and updates the image metadata Then the image is pushed to the registry The illustration below will help you understand how Kaniko works. Before You Begin This guide requires one to have a Kubernetes cluster with permissions to create, update, list, and delete a job, pods, services, and secrets. There are several guides to help you deploy a Kubernetes cluster. Install Kubernetes Cluster on Rocky Linux 8 with Kubeadm & CRI-O Install Kubernetes Cluster on Ubuntu using K3s Deploy Kubernetes Cluster on Linux With k0s Run Kubernetes on Debian with Minikube Install Kubernetes Cluster on Ubuntu with kubeadm In this guide, we will build container images from Dockerfile using Kaniko in Kubernetes with Github and Docker Registry. So, you need the following: Github repository with a Dockerfile: we will use the repo URL as the path of the Dockerfile Docker hub account: to be able to authenticate and push the Docker image. Access to Kubernetes cluster: to be able to deploy the Kaniko pod and create the docker registry secret. Step 1 – Create the Container Registry Secret We will start off by setting up the container registry secret. This is useful when pushing the built image to the registry. There are several registries supported by Kaniko. These are: Docker Hub Google GCR Amazon ECR Azure Container Registry JFrog Container Registry/JFrog Artifactory These registries are declared using the –destination flag in the manifest. In this guide, we will push the image to the Dockerhub registry. I assume that you already have a Dockerhub account. Now create the registry secret using the command: kubectl create secret docker-registry dockercred \ --docker-server=https://index.docker.io/v1/ \ --docker-username= \ --docker-password=\ --docker-email= After this, you should have the secret deployed $ kubectl get secrets NAME TYPE DATA AGE default-token-ncn6w kubernetes.io/service-account-token 3 3m48s dockercred kubernetes.io/dockerconfigjson 1 15s Step 2 – Configure Kaniko Build Contexts In the build context, the following types are supported by Kaniko: S3 Bucket Local Directory GCS Bucket Azure Blob Storage Local Tar Git Repository Standard Input The build context represents your directory containing the Dockerfile to be used to build your image. You can use any of the supported types by specifying them in the manifest using the –context flag. The prefix to be used are: Source Prefix Example Local Directory dir://[path to a directory in the kaniko container] dir:///workspace Local Tar Gz tar://[path to a .tar.gz in the kaniko container]
tar://path/to/context.tar.gz GCS Bucket gs://[bucket name]/[path to .tar.gz] gs://kaniko-bucket/path/to/context.tar.gz Standard Input tar://[stdin] tar://stdin Azure Blob Storage https://[account].[azureblobhostsuffix]/[container]/[path to .tar.gz] https://myaccount.blob.core.windows.net/container/path/to/context.tar.gz Git Repository git://[repository url][#reference][#commit-id] git://github.com/acme/myproject.git#refs/heads/mybranch# S3 Bucket s3://[bucket name]/[path to .tar.gz] s3://kaniko-bucket/path/to/context.tar.gz In this guide, We will use a GitHub repository as our build context. So we need to configure it with the required Dockerfile. For this guide, we will use a private Git, repository with a Dockerfile. The repo URL is: https://github.com/computingforgeeks/kubernetes-kaniko The repository will have a Dockerfile with the below content FROM ubuntu ENTRYPOINT ["/bin/bash", "-c", "echo hello"] The repository will have the file as shown. Step 3 – Create the Kaniko Pod Manifest So we will create our manifest below. vim pod.yaml Remember to replace the values appropriately. apiVersion: v1 kind: Pod metadata: name: kaniko spec: containers: - name: kaniko image: gcr.io/kaniko-project/executor:latest args: - "--context=git://@github.com/computingforgeeks/kubernetes-kaniko.git#refs/heads/master" - "--destination=/kaniko-demo-image:1.0" volumeMounts: - name: kaniko-secret mountPath: /kaniko/.docker restartPolicy: Never volumes: - name: kaniko-secret secret: secretName: dockercred items: - key: .dockerconfigjson path: config.json In the above file, we have used the Git API token to authenticate the private git repository. This can be avoided if you are using a public repository. The –destination is the location we want to push the image. For example in my case, the location will be klinsmann1/kaniko-demo-image:1.0. Step 4 – Run Kaniko in Kubernetes With the manifest created as desired, run Kaniko with the command: kubectl apply -f pod.yaml Follow the image build and push process. kubectl logs kaniko --follow Sample output: After this, I will have my image pushed to Dockerhub. Step 5 – Pull and Test the Image Now the image can be used to run containers on both Kubernetes and Docker. On Docker Begin by installing Docker on your system. The below guide can help you achieve this: How To Install Docker CE on Linux Systems Now run a container with the image using the command: docker run -it / For example: docker run -it klinsmann1/kaniko-demo-image:1.0 Sample Output: On Kubernetes The image can also be pulled and tested on Kubernetes. Create a deployment file as shown. $ vim deploy.yml apiVersion: apps/v1 kind: Deployment metadata: name: hello-world spec: selector: matchLabels: app: hello replicas: 1 template: metadata: labels: app: hello spec: containers: - name: hello-world image: klinsmann1/kaniko-demo-image:1.0 Apply the manifest: kubectl apply -f deploy.yml Check the status: $ kubectl get pods NAME READY STATUS RESTARTS AGE hello-world-7f67c97454-xv8xs 0/1 Completed 2 (18s ago) 19s kaniko 0/1 Completed 0 32m Check if the execution was successful. $ kubectl logs hello-world-7f67c97454-xv8xs --follow hello Voila! We have triumphantly walked through how to build container images from Dockerfile using Kaniko in Kubernetes. Now proceed and build your images and use them within your cluster.
0 notes
Text
Macfuse tool fox

#Macfuse tool fox for mac os
The filesystems repository contains source code for several exciting and useful file systems for you to browse, compile, and build upon, such as sshfs, procfs, AccessibilityFS, GrabFS, LoopbackFS, SpotlightFS, and YouTubeFS. If you prefer another language (say, Python or Java), you should create file systems in those languages after you install the relevant language bindings yourself. It comes with C-based and Objective-C-based SDKs. The macFUSE software consists of a kernel extension and various user-space libraries and tools. Therefore, many existing FUSE file systems become readily usable on macOS. It provides multiple APIs, one of which is a superset of the FUSE API (file system in userspace) that originated on Linux. Since FUSE file systems are regular applications (instead of kernel extensions), you have just as much flexibility and choice in programming tools, debuggers, and libraries as you have if you were developing standard macOS applications.įUSE implements a mechanism that makes it possible to implement a fully functional file system in a user-space program on macOS in more technical terms. Writing a file system using FUSE is orders of magnitude easier and quicker than the traditional writing in-kernel file systems. you may want to install either MacFuse or ExpanDrive which let you access the. The content of these file systems can come from anywhere: from the local disk, from across the network, from memory, or any other combination of sources. The photos and videos of the little fox family have also captured the. Ask Question Asked 5 years, 6 months ago.
#Macfuse tool fox for mac os
How to completely remove Fuse for Mac OS X, MacFUSE, NTFS-3G. OSXFUSE is a successor to MacFUSE, which has been used as a software building block. Legacy MacFUSE file systems are supported through the optional MacFUSE compatibility layer.Īs a developer, you can use the FUSE SDK to write numerous new file systems as regular user space programs. FUSE for OS X allows you to extend OS Xs native file handling capabilities via third-party file systems. MacFUSE allows you to extend macOS's native file handling capabilities via third-party file systems.Īs a user, installing the macFUSE software package will let you use any third-party FUSE file system.
0 notes
Text
Sftp mint mountain duck

#Sftp mint mountain duck how to
For example, we have created mount directory under /mnt/tecmint. Once the sshfs package installed, you need to create a mount point directory where you will mount your remote file system. Step 1: Install SSHFS Client in Linux Systemsīy default sshfs packages does not exists on all major Linux distributions, you need to enable epel repository under your Linux systems to install sshfs with the help of Yum command with their dependencies.
#Sftp mint mountain duck how to
In this article, we will show you how to install and use SSHFS client on any Linux distribution to mount remote Linux filesystem or directory on a local Linux machine. Because SSH uses encryption while transferring files over the network from one computer to another computer and SSHFS comes with built-in FUSE ( Filesystem in Userspace) kernel module that allows any non-privileged users to create their file system without modifying kernel code. SFTP is a secure file transfer protocol that provides file access, file transfer and file management features over Secure Shell protocol. Suggested Read: 10 sFTP Command Examples to Transfer Files on Remote Servers in Linux SSHFS stands for ( Secure SHell FileSystem) client that enable us to mount remote filesystem and interact with remote directories and files on a local machine using SSH File Transfer Protocol ( SFTP). Sshfs Mount Remote Linux Filesystem or Directory What Is SSHFS? We have practically tested by installing SSHFS client on one of our Linux system and successfully mounted remote file systems.īefore we go further installation let’s understand about SSHFS and how it works. This article is useful for those users and system administrators who want to mount remote file system on their local systems for whatever purposes. The main purpose of writing this article is to provide a step-by-step guide on how to mount remote Linux file system using SSHFS client over SSH.
0 notes
Text
Docker is like virtualization but only for your userspace, not your whole OS.
Instead of running a whole OS in a VM, you use OS level tools to create an environment that has limited access to resources and filesystems. On Linux that's done with namespaces, cgroups, and OverlayFS. Docker provides a unified simpler way to use these tools on Linux, so you can provide an image and a specification that contains the FS that will be run in a container.
Cgroups especially is what allows this to exist. You can use cgroups to control which resources, processes, and filesystems a process can reach, and using OverlayFS and chroot you can create a filesystem of the root environment for a process to run in that runs with pretty much no virtualization overhead but is segmented from other containers and most of the Host OS.
Because Linuxes are pretty similar, Linux can run a different distribution by just moving the / root into a virtual FS set up for the new distribution. Docker on Mac and Windows has to first run a normal Linux VM and then run docker on that.
Containers are extremely lightweight because instead of running a whole other OS, the OS just lies to some processes to make them think they're running on an isolated system, and you can more easily share resources because you don't have to create e.g. whole virtual disks and CPU limits per VM.
It has some associated risks, a poorly set up docker container has lots of ways to break out of its jail and affect the host system, but it's getting better and it's popular as a way to reduce the chance of multiple services on one machine interfering with each other without having to run each one in a whole VM.
I'll try and see if I can find a good blog post I read about how to build containers without docker, it's very illuminating.
so what does docker actually do...
47 notes
·
View notes
Text
Ntfs 3g For Mac Os X

Ntfs-3g For Mac Os X Dmg
Ntfs-3g For Mac Os X 10.12.5
Ntfs-3g For Mac Os X 2010.10.2
NTFS-3G for Mac adds drivers to your OS X installation that allow you to read and write to NTFS-formatted thumb and external hard drives as if you're using a Windows machine. The software comes. On October 5, 2009, NTFS-3G for Mac was brought under the auspices of Tuxera Ltd. And a proprietary version called Tuxera NTFS for Mac was made available. On April 12, 2011, it was announced that Ntfsprogs project was merged with NTFS-3G. NTFS-3g added TRIM support in version 2015.3.14. Follow this process to enable NTFS Write Support on Mac OS X Yosemite for FREE. We install three free applications to achieve that. Here are the links for th.
UPD: There is even better way to solve the same issue with native Mac OS X drivers, but it has its own pros and cons. Read at the end for details. UPD (IMPORTANT): Native driver makes NTFS unusable. Read below for details. Mac OS X Lion (10.7) was released recently, in the end of July 2011. And many users had started to complain that their NTFS disks stopped working.
While OS X can natively read and write FAT-formatted drives, it’s a one-way (read-only) street with NTFS—that is, without a little help from Paragon. NTFS for Mac 14 installs a preference pane.
NTFS-3GDeveloper(s)Tuxera Inc.Stable releaseWritten inCOperating systemUnix-like, HaikuTypeLicenseDual-licensed GNU GPL/Proprietary[citation needed]Websitewww.tuxera.com/community/open-source-ntfs-3g/
NTFS-3G is an open-sourcecross-platform implementation of the Microsoft WindowsNTFS file system with read/write support. NTFS-3G often uses the FUSEfile system interface, so it can run unmodified on many different operating systems. It is runnable on Linux, FreeBSD, NetBSD, OpenSolaris, illumos, BeOS, QNX, WinCE, Nucleus, VxWorks, Haiku,[1]MorphOS, Minix, macOS[2] and OpenBSD.[3][4] It is licensed under the GNU General Public License. It is a partial fork of ntfsprogs and is under active maintenance and development.
NTFS-3G was introduced by one of the senior Linux NTFS developers, Szabolcs Szakacsits, in July 2006. The first stable version was released on February 21, 2007, as version 1.0. The developers of NTFS-3G later formed a company, Tuxera Inc., to further develop the code. NTFS-3G is now the free 'community edition',[1][failed verification] while Tuxera NTFS is the proprietary version.
Features[edit]
NTFS-3G supports all operations for writing files: files of any size can be created, modified, renamed, moved, or deleted on NTFS partitions. Transparent compression is supported, as well as system-level encryption.[5] Support to modify access control lists and permissions is available.[6] NTFS partitions are mounted using the Filesystem in Userspace (FUSE) interface. NTFS-3G supports hard links, symbolic links, and junctions. With the help of NTFS reparse point plugins, it can be made to read chunk-deduplicated files, system-compressed files, and OneDrive files.[7] NTFS-3G provides complete support and translation of NTFS access control list (ACL) to POSIX ACL permissions. A 'usermap' utility is included to record the mapping from UIDs to Windows NT SIDs.
NTFS-3G supports partial NTFS journaling, so if an unexpected computer failure leaves the file system in an inconsistent state, the volume can be repaired. As of 2009, a volume having an unclean journal file is recovered and mounted by default. The ‘norecover’ mount option can be used to disable this behavior.[8]

Performance[edit]
Benchmarks show that the driver's performance via FUSE is comparable to that of other filesystems' drivers in-kernel,[9] provided that the CPU is powerful enough. On embedded or old systems, the high processor usage can severely limit performance. Tuxera sells optimized versions of the driver that claims to have improved CPU utilization for embedded systems and MacOS.[10]
The slowness of NTFS-3G (and FUSE in general) on embedded systems is attributed to the frequent context switching associated with FUSE calls. Some open-source methods provided to reduce this overhead include:[11]
The underlying FUSE layer has an option called big_writes to use larger blocks when writing. Using a larger block means fewer context switches. This is in fact a solution recommended by Tuxera.[12] A patch is available to use an even larger block.[13]
There is also a Linux kernel option called lazytime to reduce the writes on file access.
Synology Inc. uses a modified NTFS-3G on their NAS systems. It replaces the ntfs-3g inode caching CACHE_NIDATA_SIZE with a different mechanism with unsure benefit. (It also includes an alternative Security Identifier translation for the NAS.)
History[edit]

NTFS-3G forked from the Linux-NTFS project on October 31, 2006.
On February 21, 2007, Szabolcs Szakacsits announced 'the release of the first open-source, freely available, stable read/write NTFS driver, NTFS-3G 1.0.'
On October 5, 2009, NTFS-3G for Mac was brought under the auspices of Tuxera Ltd. and a proprietary version called Tuxera NTFS for Mac was made available.[14]
On April 12, 2011, it was announced that Ntfsprogs project was merged with NTFS-3G.[15]
NTFS-3g added TRIM support in version 2015.3.14.
See also[edit]
References[edit]
^ abc'STABLE Version 2017.3.23 (March 28, 2017)'. Tuxera. Tuxera. 2017-03-23. Retrieved 2017-03-23.
^NTFS-3G for Mac OS X ('Catacombae')
^'OpenBSD adds fuse(4) support for adding file systems in userland'. OpenBSD Journal. 2013-11-08. Retrieved 2013-11-08.
^'ntfs_3g-2014.2.15 – FUSE NTFS driver with read/write support'. OpenBSD ports. 2014-01-05. Retrieved 2015-02-14.
^NTFS-3G FAQ
^NTFS-3G: NTFS Driver with Ownership and permissions
^André, Jean-Pierre (March 1, 2019). 'NTFS-3G: Junction Points, Symbolic Links and Reparse Points'. jp-andre.pagesperso-orange.fr.
^'NTFS-3G 2009.2.1 changelog'. Archived from the original on 2009-03-23. Retrieved 2012-09-10.
^Comparing NTFS-3G to ZFS-FUSE for FUSE Performance
^Performance at Tuxera
^Gothe, Markus. 'On Linux NTFS Performance'. Retrieved 3 October 2019.
^'NTFS-3G Questions'. Tuxera. Workaround: using the mount option “big_writes” generally reduces the CPU usage, provided the software requesting the writes supports big blocks.
^Wang, M. 'linux - Disadvantages of ntfs-3g `big_writes` mount option'. Unix & Linux Stack Exchange. Retrieved 3 October 2019.
^NTFS-3G for Mac OS X is now Tuxera NTFS for Mac
^Release: NTFS-3G + NTFSPROGS 2011.4.12
External links[edit]
Retrieved from 'https://en.wikipedia.org/w/index.php?title=NTFS-3G&oldid=958820922'
3 Free NTFS Solution
UPD 21.08.2011: There is even better way to solve the same issue with native Mac OS X drivers, but it has its own pros and cons. Read at the end for details.
UPD 12.09.2011 (IMPORTANT): Native driver makes NTFS unusable. Read below for details.
Mac OS X Lion (10.7) was released recently, in the end of July 2011. And many users had started to complain that their NTFS disks stopped working. And the much worse problem is that “old” solutions do not work well.
Ntfs-3g For Mac Os X Dmg
But after one or two weeks of researching of this issue, I’ve managed to make NTFS work in Mac OS X Lion (10.7). The key here is a proper combination of software versions.
So I will shortly describe the usual choices for external data storages, and what problems arises with each of them. And later I will show how you can get the most universal way — NTFS — to work where it does not work by default, with links and pictures.
Data Storages
The only reason to worry about this problem is an ability to access external storage drives. Even if these are your own drives and you can select a filesystem to use, that choice is not easy.
There are few possible choices for large (~1TB) file storages, but each has very unpleasant limitations and issues:
* HFS+/HFSX (or “Mac OS Extended”/”Mac OS Extended (case sensitive)”) — okay with big volumes and big files, but works natively under Mac OS X and Linuxes only. Windows need third-party software, which is either free file browser/extractor or paid low-level drivers.
* FAT32 work in each and every OS now, but has limitation for file size up to 4GB (so, you cannot store DVD image, which is usually 4.5+ GB).
* FAT64 (exFAT) is a new solution, but it works natively only in Mac OS X and Windows 7. Older Windows systems (Vista, XP) require Service Packs and updates to support exFAT. Linuxes do not support exFAT yet at all. More on that, it has only one file table, so if this only place will be corrupted on write, I will get all the data lost.
* NTFS. Okay with big files an bug volumes. Works natively in all Windows systems. Works fluently in all Linux systems. Has native read-only support in Mac OS X. But has not write support under Mac OS X.
As you can see, in terms of cross-compativility, NTFS is the best choice: it works almost everywhere, and with no limitations. The only issue is write mode in Mac OS X.
Taking into account that you probably have a lot of friends with NTFS volumes, who can visit you and bring you something interesting there, you actually have no choice except as try to make NTFS working.
So, let’s do it.
Paid NTFS Solutions
But first, in case you want to make your own research, or you are looking for a solution that just works out of the box, and you are ready to pay for it, you can give a try to Paragon NTFS for Max OS X 9.0 for $19.99 (5-days trial). That is much cheaper than Tuxera NTFS for Mac for $36.02 (with 15-days trial).
The former one definitely works – I’ve tried it in trial. Just install and get everything ready: both read and write modes, auto-mount, and also NTFS formatting in Disk Utility, disk checking, etc.
I haven’t tested the latter one, so you can leave a comment here about your experience with Tuxera paid solution.
Ntfs-3g For Mac Os X 10.12.5
Free NTFS Solution
This free solution requires some efforts. Not so much, of course. Well, if you are going to make your own research, it can be lots of efforts, since the situation with NTFS-3G is not very clear now.
But if you are just about a ready, copy-n-install solution, it will be easy, and requires only these two or three steps:
* MacFUSE 64-bit.
* NTFS-3G stable.
* “15 seconds” error work-around (optional).
MacFUSE 64-bit
First, you need MacFUSE with 64 bit support. That is the main problem with Mac OS X Lion — it uses 64-bit kernel, and all previous version of Mac OS X used 32-bit one. So, old MacFUSE binaries won’t work anymore.
You can get Tuxera MacFUSE 2.2 image for free (could not find a page with it, just a download links) or try to compile OSXFUSE from sources. I’ve used the former one.
You can see MacFUSE preferences in “System Preferences”. Well, actually these are not preferences, but only “update” and “uninstall” actions, and current version info:
NTFS-3G stable
Second, you will need working copy of NTFS-3G. Long story short, NTFS-3G is either already dead or is going to die. There is its ancestor: Tuxera NTFS for Mac (paid).
But we are going to use old version of NTFS-3G — the one from 2010. I’ve got one from here. But you can try googling for it, or browse here for this exact version (not 2011 — I’m not sure they work).
I also tried to install later version from MacPorts, but it does not work too: mounts something that stills unreadable. That is in addition to an error in installation process (“mv” does not see the libntfs-3g file or so).
Now, when you have installed two binary packages, you can restart Mac OS X and try to attach the drive. It should work.
NTFS-3G preferences pane looks populated and interesting:
“15 seconds” error work-around
But it will show you the error message saying that there were not signal in 15 seconds:
This is not a big problem, because everything works fine. Only annoying message box is a problem.
So the third, optional step is to address this issue. You can follow this link: https://gist.github.com/1100318 (see first and the only comment under the code). You just download this attached C file, run “gcc” command line from the comment, and replaces the “fuse_wait” binary as said there. Yes, you will need “gcc” here.
And voila! Now you have working NTFS filesystem for free with no “15 seconds” error message. Profit!
Problems
Nevertheless, Mac OS X is a Unix-based system. And Unix-based system is a big problem when they work as desktop OS (earlier I thought that on Linux-based system because of community-driven and crowd-based development concept). This solution has some problems too. Though they are not about the solution itself, but about the components used.
The most important problem now is the speed: with this NTFS-3G on MacBook Air (4GB, i7 CPU) write speed for USB 2.0 drive is about 3.3 MB/s. Just to compare, the same drive in the same port, but with exFAT/FAT64 partition can write with ~38 MB/s (or fast enough to make exact estimation; will try larger files later).
Also, immediately following the mount of a drive, there is a line in system log with an error message saying:
Ntfs-3g For Mac Os X 2010.10.2
8/21/1112:48:43.000AM kernel:NTFS-fs error(device/dev/disk1s1,pid4859):ntfs_system_inodes_get():$LogFile isnotclean.Mounting read-only.Mount inWindows.
All the “cons” can be solved by installing NTFS-3G and keeping it disabled all the time, except when you need to format new volume, or to mount a problematic volume. Actually, it is better to enable NTFS-3G, mount it with NTFS-3G, then unmount, disable NTFS-3G, and mount it with native drivers; or use “ntfsfix” if you are not afraid of command line after all these hacks ;-)
IMPORTANT UPD 12.09.2011: Please read comments below: people say that this driver makes NTFS filesystem corrupted and unusable.
I had the same experience: my NTFS volume become only partially readable in Mac OS X, and completely unusable in Windows. More on that, when I tried to attach the drive, Windows kernel started to use 100% CPU, and did not stop to do so even when the drive were detached. Drive letter never appeared.
Luckily for me, I had two backups of the whole volume (I do so when experimenting with new drives, since I once lost my whole photo archive due to burned out new drive). To solve the whole problem of NTFS@Mac, I’ve finally bought Paragon NTFS for Mac.
0 notes